GoogleWiFi + Pi-hole and NordVPN
Hello friends, as I promised in my previous post I’m going to tell you about configuring GoogleWiFi router with a Raspberry Pi server acting as DHCP and DNS server / VPN gateway. While part related to NordVPN is vendor specific I feel it would not be too hard to use similar setup with any VPN provider. Feel free to skip VPN related part.
I’m not sponsored by NordVPN, instructions provided as is and as any information from the Internet should be used carefully.
Why GoogleWiFi?
I’m a lazy person and I don’t want to spend lot of time managing my router. I was playing with DD-WRT capable routers for a while and I feel it is more secure to offload this task to a big company.
The downside is that GoogleWiFi is largerly a black box and you have little idea of what happens inside. You can not disable DHCP server. If you configure an alternative DNS server in GoogleWiFi settings the router still advertises own IP as the DNS server and acts as a forwarder instead of allowing clients to connect to a custom DNS server directly. I find this behavior highly suspicious.
Having said that I don’t believe GoogleWiFi have capabilities to analyze all trafic in the internal network. And they say they don’t track you which you may or may not believe. If you are concerned about this possibility I recommend installing VPN clients on devices connected to the network so LAN traffic goes through VPN as well. You may also find this instruction on how to make a tin foil hat useful.
The other plus of GoogleWiFi is that it is easy to configure a secondary WiFi network, a ‘guest’ one.
In my setup traffic from ‘default’ LAN 192.168.86.0/24 is all routed via VPN, but clients on ‘guest’
LAN access the Internet directly - handy for connecting anything with its own VPN client. This is as well
a good fall back option in case you mess up something in 192.168.86.0/24 setup.
Why have Pi-hole?
- Ads on the Internet are obnoxious. Some sites are barely useful with no ad-blocking plugins installed.
- Most of browsers are made or subsidised by companies why rely on ad revenue. These companies do not want you to have an ability to control which content you get and what information you end up sharing with the company.
- Some platforms and internet connected devices do not provide any mechanism to opt out of ads at all.
Having a separate device acting as a filter allows you to turn the knob yourself. Filter is on for all devices using Pi-hole as a DNS server automatically. You can create your own rule lists and have a fine grained control over your ad traffic.
Why connect to the Internet via VPN?
Once again tracking data is a source of revenue for lot of companes. Using VPN reduces your footprint on the Internet maybe to the point it ceases to be sound to track you economically. Remember the weakest link is always between the monitor and the backrest.
Hardware
My network setup consists of a modem connected to ISP, GoogleWiFi device with WAN port connected to the modem and with LAN port connected to Raspberry Pi.
You want some good quality cables and you want them short - it looks neat. Long and chewed up network cable can be a traffic bottleneck.
You want Raspberry Pi with a built in Ethernet port. You could use a USB dongle with Ethernet port but the performance would be terrible.
I’m using Raspberry Pi 3 Model B Plus Rev 1.3 and I suspect anything more powerful/newer should work as well.
You can confirm your Raspberry Pi model from the operating system in the following way:
$ cat /sys/firmware/devicetree/base/model
Raspberry Pi 3 Model B Plus Rev 1.3
GoogleWiFi configuration
As I already mentioned GoogleWiFi is not very flexible when it comes to a non-orthodox setup. You can not configure GoogleWiFi DHCP server to advertise Raspberry Pi as a DNS server or a default gateway unless you run GoogleWiFi in bridge mode but then you lose mesh capabilities and can’t have a ‘guest’ WiFi network.
Good thing is Pi-hole comes with own DHCP server and you can have two DHCP servers on same 192.168.86.0/24
LAN in case their pools do not intersect.
What we are going to do is configure GoogleWiFi with only one IP in the pool: 192.168.86.2. Later
we’ll assign this IP to eth0 interface of Raspberry Pi statically.
You may need to enable ‘Cloud features’ in GoogleWiFi settings temporary. I had to enable ‘Cloud features’ to save a modified DHCP IP reservations list.
Settings => Network & General => Advanced networking => LAN
- Leave ‘Router LAN IP’
192.168.86.1 - Leave ‘Subnet mask’
255.255.255.0 - ‘DHCP Address Pool’, change both ‘Starting IP’ and ‘Ending IP’ to
192.168.86.2 - Save settings
Check the list of devices connected to GoogleWiFi - you may need to disconnect all devices from your ‘default’ network so Raspberry Pi does not have to fight over a single available IP with other clients.
Raspberry Pi bootstrap
I recommend using 32Gb card with your Raspberry Pi. Raspbian image would fit on a smaller card but there is only so many write operations SD card can handle. Having a larger card allows to spread these writes and the card is going to last longer. We’ll mount log and temporary file directories into RAM once again to make less writes to SD card. A downside (or a feature?) is that you lose logs after Raspberry Pi restart. You can mount dirs back to SD card for debugging purposes.
Flash the image and boot Rasbperry Pi
- Download and install Raspberry Pi imager for your operating system
- Chose Rasberry Pi OS (other) => Raspberry Pi OS Lite (32-bit). You don’t want to waste limited resources on bells and whistles. CLI FTW!
- Flash the card
- Open the card and create an empty file named ‘ssh’ in the root directory. SSH server is going to be started on boot and you will be able to log into Rasbperry Pi from other host on ‘default’ network.
- Insert the SD card into Raspberry Pi and power it on.
Now you can either
- connect a monitor and a keyboard to Raspberry Pi to access CLI interface
- or if you don’t have HDMI monitor/USB keyboard you can connect to Raspberry Pi via SSH from an other host
$ ssh [email protected]
Note since there is only one IP address in the DHCP pool you will need to configure an IP address on your
client host manually. Set it to 192.168.86.3. This configuration is temporary, once Pi-hole is up it
will serve configurations to all clients on the network.
At this point you should be able to log into Raspberry Pi using default credentials pi/raspberry.
Basic Raspberry Pi configuration
Let’s prepare Raspberry Pi for Pi-hole installation
$ sudo raspi-config
-
Change password to a secure one
-
Configure eth0 with the static IP
192.168.86.2and default gateway192.168.86.1 -
Advanced options => Expand Filesystem so full volume of the SD card is available to the operating system.
-
Reboot, log into Raspberry Pi
-
Confirm /etc/dhcpcd.conf contains correct static IP configuration for eth0
$ cat /etc/dhcpcd.conf
...
interface eth0
        static ip_address=192.168.86.2/24
        static routers=192.168.86.1
        static domain_name_servers=192.168.86.1
- Disable swap to minimize writes to SD card
$ sudo apt-get remove dphys-swapfile
- Check if root partition is mounted with
noatimeoption to minimize writes to SD card
$ cat /etc/fstab
proc            /proc           proc    defaults          0       0
PARTUUID=xxxxxxx7-01  /boot           vfat    defaults          0       2
PARTUUID=yyyyyyy7-02  /               ext4    defaults,noatime  0       1
- Mount
/tmp,/var/tmp,/var/loginto RAM to minimize writes to SD card
$ sudo vi /etc/fstab
...
tmpfs    /tmp    tmpfs    defaults,noatime,nosuid,size=100m    0 0
tmpfs    /var/tmp    tmpfs    defaults,noatime,nosuid,size=30m    0 0
tmpfs    /var/log    tmpfs    defaults,noatime,nosuid,mode=0755,size=100m    0 0
-
Reboot, log into Raspberry Pi
-
Confirm swap is off,
/proc/swapslist should not have any files listed:
$ cat /proc/swaps
Filename				Type		Size	Used	Priority
- Confirm
/tmp,/var/tmp,/var/logare monuted to RAM
$ mount | grep tmpfs
...
tmpfs on /var/log type tmpfs (rw,nosuid,noatime,size=102400k,mode=755)
tmpfs on /var/tmp type tmpfs (rw,nosuid,noatime,size=30720k)
tmpfs on /tmp type tmpfs (rw,nosuid,noatime,size=102400k)
...
- Update Raspberry Pi to the latest version
$ sudo apt update
$ sudo apt full-upgrade
At this point Raspberry Pi should be ready for Pi-hole suite installation.
Pi-hole configuration
Run the helper script to install and configure Pi-hole
$ curl -sSL https://install.pi-hole.net | bash
You should get credentials for the Pi-hole admin interface on http://192.168.86.2/admin
- Log into the admin interface, navigate
Settings => DNS
Here we are going to configure Pi-hole to use NordVPN upstream nameservers. It is important to use DNS servers from your VPN provider not ones provided by ISP - DNS queries log would show which domains your host tried to resolve and you potentially visited. Feel free to skip this step if you do not configure VPN.
- Set upstream DNS to
103.86.96.100and103.86.99.100

Pi-hole DNS settings
- Save settings
- In Pi-hole admin interface navigate
Settings => DHCP - Enable DHCP server
- Set DHCP address range from
192.168.86.20to192.168.86.250 - Set Router (gateway) IP address to
192.168.86.2 - Set Domain
lan<= the domain is hardcoded in GoogleWiFi so we can’t use anything else here. - DHCP lease time
24
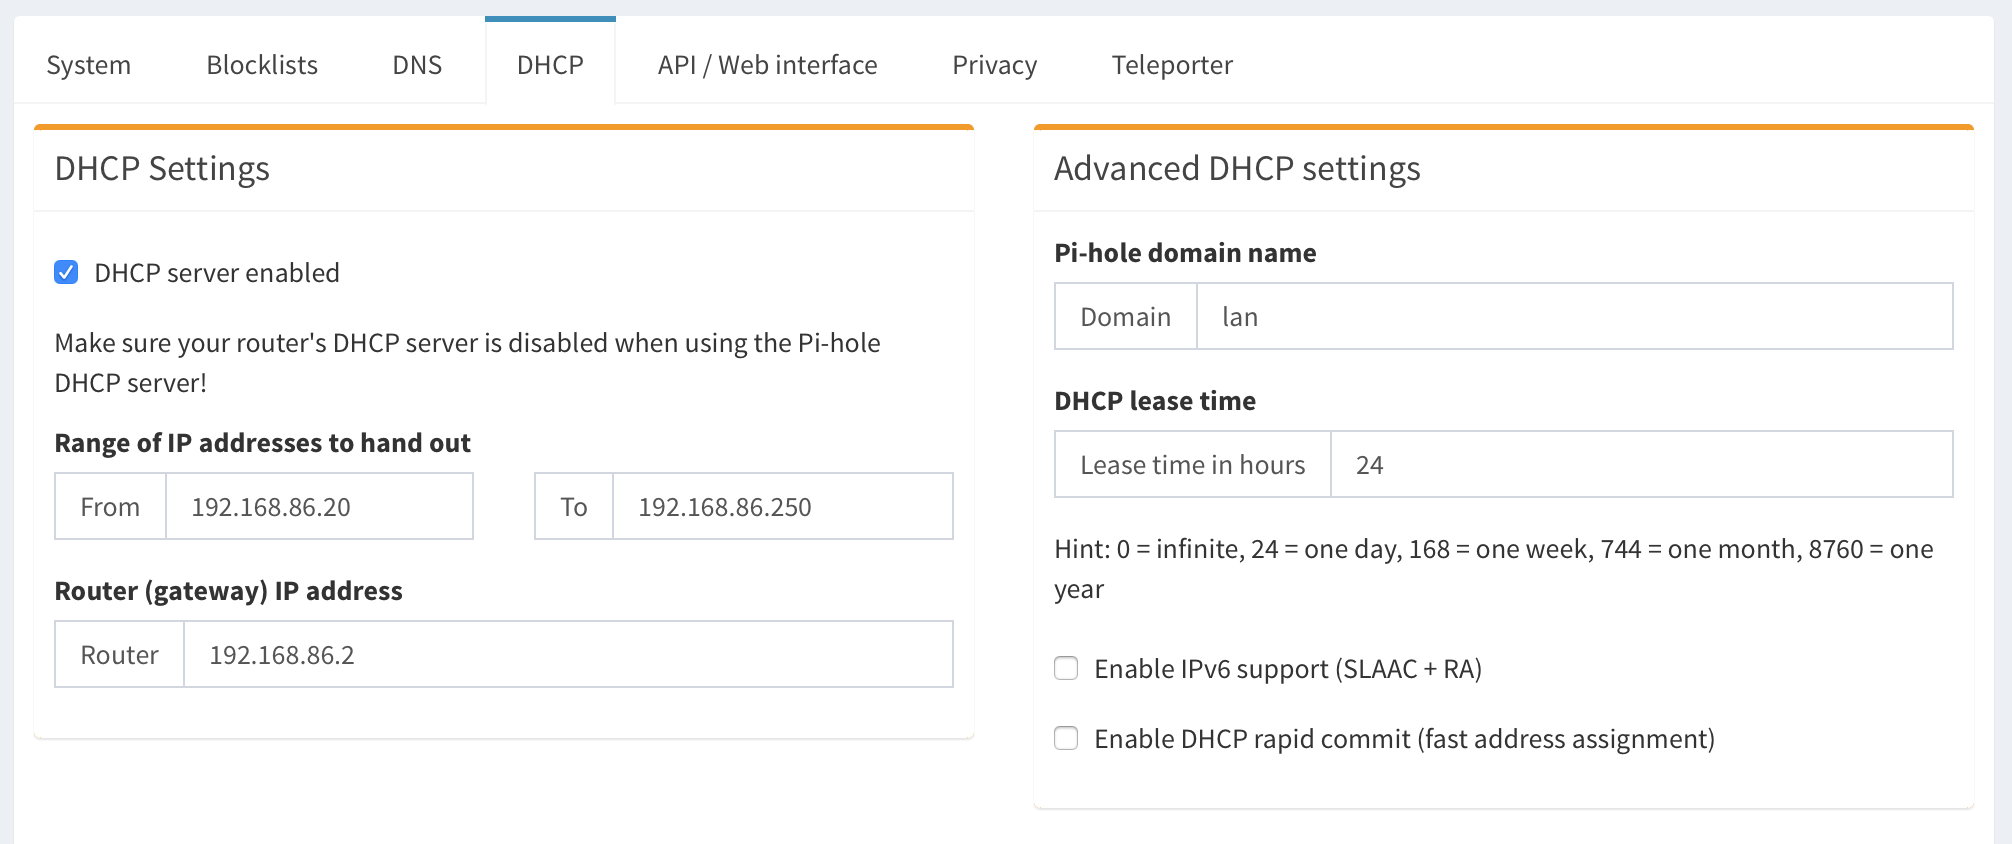
Pi-hole DHCP settings
-
Save settings
-
Log into Raspberry Pi via SSH and modify static IP configuration to use localhost
127.0.0.1as DNS server instead of GoogleWiFi192.168.86.1./etc/dhcpcd.confshould have the following config for eth0 interface:
$ cat /etc/dhcpcd.conf
...
interface eth0
        static ip_address=192.168.86.2/24
        static routers=192.168.86.1
        static domain_name_servers=127.0.0.1
- This step is not necessary but won’t hurt - open GoogleWiFi settings and configure DHCP IP reservation for eth0 of Raspberry Pi
Settings => Network & General => Advanced networking => DHCP IP reservations
Press +, Raspberry Pi is going to show up in the list as CromeOS device. Assign IP 192.168.86.2 to
CromeOS device. This way even if Raspberry Pi for some reason loses static IP configuration it will
still be able to get the IP via DHCP and no other host is going to claim 192.168.86.2.
- Disable ‘Cloud features’ in GoogleWiFi settings.
- Reboot Raspberry Pi just to make sure all services are starting automatically and the system can recover automatically after reboot or power loss.
- Connect a new device to the ‘default’ WiFi network. New client should get an IP in
192.168.86.20-192.168.86.250range. Test if you can browse Internet from the newly connected device. Check Pi-hole dashboard http://192.168.86.2/admin and confirm your new client shows up in the ‘Network’ section and has a checkmark in ‘Uses Pi-hole’ column. Confirm counters of total/blocked DNS queries increase. Load some site you know has lot of ads and see if the situation changed. - Configure clients to get IPs via DHCP.
I recommend to spend few days running this setup before you continue with VPN configuration. if something does not work you don’t have to guess if it’s Pi-hole or VPN problem. Remember you can always connect to ‘guest’ network if the ‘default’ one does not have Internet / clients don’t get IPs or whatnot.
NordVPN + openpyn configuration
NordVPN provides a packaged cient for Debian derivatives.
We can’t use this client because it flushes firewall rules needed to configure Raspberry Pi
as a VPN gateway and there is no way to override this behaviour. We will be using openvpn client
configured with openpyn service.
First I tried following these instructions
and configure both openvpn and firewall manually. There are multiple issues with this approach:
- The process of fetching server configuration file manually is tedious. On top of that VPN servers come and go and when a server you was connected to is recycled you need to find a new server, fetch config, restart openvpn client and so on.
- You can get ‘Recommended server’ from here. It looks like the only metric taken into account here is a distance. The server can be close to you but very loaded. In fact when I was testing the VPN connection manually using ‘Recommended server’ from this page the performance was so bad I almost gave up on the whole idea of using VPN.
Fret not! There is a solution - tool made by jotyGill
- Runs as a service
- Fetches VPN server configuration files automatically
- Configures firewall, allows to open ports you need open
- Choses the best VPN server for you based on pings and server load. I can barely notice VPN is active
when connected to a server chosen by
openpyn
openvpn and openpyn installation
- Log into Raspberry Pi via SSH
$ ssh [email protected]
- Enable forwarding so Raspberry Pi could act as a router. Open
/etc/sysctl.confand uncomment theip_forwardconfiguration line
$ sudo vi /etc/sysctl.conf
...
net.ipv4.ip_forward=1
...
- Install dependencies
$ sudo apt install openvpn unzip wget python3-setuptools python3-pip
- Install
openpynfrom my fork. I had to make few changes in the tool - as of May 2020 original stable version didn’t support opening UDP ports, DHCP traffic from a broadcast IP, had to be re-initialized after Raspberry Pi restart because log directory mounted to tempfs is wiped out on reboot. All these issues are addressed inallow_udpbranch. I see there is a new version of tool in the development branch of the original repo. This new version may or may not address all these issues but I have no time to actively contribute right now. Just made a hack that works for this particular setup. Feel free to review the diff with master before installation.
$ sudo python3 -m pip install --upgrade --force-reinstall git+https://github.com/k0ssk/openpyn-nordvpn.git@allow_udp
- Initialize
openpyn. You’ll need to have your NordVPN credentials ready as well as options to launchopenpynwith.
$ sudo openpyn --init
options example:
us -t 5 -f --allow 22 53 80 --allow-udp 53 --dhcp-iface eth0 --update --masquerade
--updateforcesopenpynto fetch new VPN server configs on start - if you don’t supply this options VPN server list is going to get stale.--masqueradecreates iptables rule in NAT table allowing hosts in the internal network to connect to the Internet via pihole server.usconnect to servers in US of A. Useopenpyn --listto find available options-t 5compare 5 servers and chose the best one-fforce firewall rules--allow 22 53 80allow connections to TCP ports 22 (SSH), 53 (DNS), 80 (admin interface)--allow-udp 53allow connections to UDP ports 53 (DNS)--dhcp-iface eth0allow connections from broadcast IP to the port 67 on eth0. Needed for DHCP configuration. More details in my previous post. I higly recommend to check full list of options in the documentation on Github.
Final touches
- Enable
openpynservice to start on boot
$ sudo systemctl enable openpyn
- Start
openpynservice
$ sudo systemctl start openpyn
If you found you need to update options openpyn starts with modify service configuration file, reload
the config and restart openpyn service
$ sudo vi /etc/systemd/system/multi-user.target.wants/openpyn.service
$ sudo systemctl daemon-reload
$ sudo systemctl restart openpyn
$ sudo systemctl status openpyn
Whew! We are close, just needed to confirm everything works as expected.
- Confirm tun0 interface has been created
$ ip a | grep tun
13: tun0: <POINTOPOINT,MULTICAST,NOARP,UP,LOWER_UP> mtu 1500 qdisc pfifo_fast state UNKNOWN group default qlen 100
- Confirm iptables rules were created
$ sudo iptables -L -n -v
Chain INPUT (policy DROP 18741 packets, 2387K bytes)
 pkts bytes target     prot opt in     out     source               destination
13108 6852K ACCEPT     all  --  tun+   *       0.0.0.0/0            0.0.0.0/0            ctstate RELATED,ESTABLISHED
4565K 6147M ACCEPT     all  --  eth0   *       43.80.254.11         0.0.0.0/0            ctstate RELATED,ESTABLISHED
16788 2201K ACCEPT     all  --  eth0   *       192.168.86.0/24      0.0.0.0/0            ctstate RELATED,ESTABLISHED
    0     0 ACCEPT     all  --  lo     *       43.80.254.11         0.0.0.0/0            ctstate RELATED,ESTABLISHED
67762 4867K ACCEPT     all  --  lo     *       127.0.0.0/8          0.0.0.0/0            ctstate RELATED,ESTABLISHED
 6328  436K ACCEPT     all  --  lo     *       0.0.0.0/0            0.0.0.0/0
    1   145 ACCEPT     icmp --  *      *       0.0.0.0/0            0.0.0.0/0            icmptype 255
    0     0 DROP       all  --  *      *       127.0.0.0/8          0.0.0.0/0
    3   228 ACCEPT     tcp  --  eth0   *       192.168.86.0/24      0.0.0.0/0            tcp dpt:22
   95  6080 ACCEPT     tcp  --  eth0   *       192.168.86.0/24      0.0.0.0/0            tcp dpt:53
 1648  105K ACCEPT     tcp  --  eth0   *       192.168.86.0/24      0.0.0.0/0            tcp dpt:80
14782 1025K ACCEPT     udp  --  eth0   *       192.168.86.0/24      0.0.0.0/0            udp dpt:53
 6499 1776K ACCEPT     udp  --  eth0   *       0.0.0.0/0            0.0.0.0/0            udp dpt:67
    0     0 ACCEPT     tcp  --  lo     *       127.0.0.0/8          0.0.0.0/0            tcp dpt:22
    0     0 ACCEPT     tcp  --  lo     *       127.0.0.0/8          0.0.0.0/0            tcp dpt:53
    0     0 ACCEPT     tcp  --  lo     *       127.0.0.0/8          0.0.0.0/0            tcp dpt:80
    0     0 ACCEPT     udp  --  lo     *       127.0.0.0/8          0.0.0.0/0            udp dpt:53

Chain FORWARD (policy DROP 5215 packets, 438K bytes)
 pkts bytes target     prot opt in     out     source               destination
  12M 1127M ACCEPT     all  --  eth0   tun0    0.0.0.0/0            0.0.0.0/0
  17M   22G ACCEPT     all  --  tun0   eth0    0.0.0.0/0            0.0.0.0/0            ctstate RELATED,ESTABLISHED

Chain OUTPUT (policy DROP 48965 packets, 5627K bytes)
 pkts bytes target     prot opt in     out     source               destination
    0     0 ACCEPT     udp  --  *      lo      0.0.0.0/0            103.86.96.100        udp dpt:53
 4608  317K ACCEPT     udp  --  *      tun+    0.0.0.0/0            103.86.96.100        udp dpt:53
    0     0 ACCEPT     udp  --  *      lo      0.0.0.0/0            103.86.99.100        udp dpt:53
 7150  494K ACCEPT     udp  --  *      tun+    0.0.0.0/0            103.86.99.100        udp dpt:53
 1740  250K ACCEPT     all  --  *      tun+    0.0.0.0/0            0.0.0.0/0
4270K  589M ACCEPT     all  --  *      eth0    0.0.0.0/0            43.80.254.11
30525   17M ACCEPT     all  --  *      eth0    0.0.0.0/0            192.168.86.0/24
    0     0 ACCEPT     all  --  *      lo      0.0.0.0/0            43.80.254.11
70913 5062K ACCEPT     all  --  *      lo      0.0.0.0/0            127.0.0.0/8
 3177  242K ACCEPT     all  --  *      lo      0.0.0.0/0            0.0.0.0/0
- Check MASQUERADE rule has been created in NAT table:
sudo iptables -L -n -v -t nat
Chain PREROUTING (policy ACCEPT 3552 packets, 255K bytes)
 pkts bytes target     prot opt in     out     source               destination

Chain INPUT (policy ACCEPT 538 packets, 41092 bytes)
 pkts bytes target     prot opt in     out     source               destination

Chain POSTROUTING (policy ACCEPT 179 packets, 12804 bytes)
 pkts bytes target     prot opt in     out     source               destination
  415 31093 MASQUERADE  all  --  *      tun+    0.0.0.0/0            0.0.0.0/0

Chain OUTPUT (policy ACCEPT 572 packets, 43529 bytes)
 pkts bytes target     prot opt in     out     source               destination
- Confirm from a client host you are connected to the Internet via VPN. Open NordVPN. If you are connected via VPN the line on the very top of the screen going to read
Your IP: <your external IP> · ISP: Some ISP · Your Status: Protected
- Confirm DNS queries do not leak to your ISP here.
We did it! Happy browsing!